Skip to content

Felix Schneider

23 posts by Felix Schneider

How VS Code Snippets can improve your workflow when working with Astro

A collection of old newspaper sheets piled on a wooden table, displaying vintage articles and worn edges.

This article demonstrates how code snippets can be created in Visual Studio Code that can significantly boost your productivity when regularly working with Astro’s content collections.

The need for snippets

Astro supports schema validation for your frontmatter fields in Markdown and MDX files. Therefore, many content files of your collections will have the same structure between the code fences (---). If you are tired of typing the same frontmatter fields over and over again, you can create a code snippet that will automatically generate the basic structure of the desired frontmatter while letting you conveniently edit the fields with TAB ⇥ inputs.

Creating a snippet

You can create global snippets which can be scoped to multiple languages or language-specific snippets. Since we want the frontmatter snippet in Markdown and MDX files, we will create a global snippet under Code/User/snippets/markdown.code-snippets with the scope markdown,mdx. Follow the instructions in the official documentation for the correct steps for your Operating System.

Here is an example of how your snippet could look like. You can freely adjust the body or prefix as you see fit:

Code/User/snippets/markdown.code-snippets
{
"Add Markdown frontmatter": {
"scope": "markdown,mdx",
"prefix": "ffmt",
"body": [
"---",
"title: $TM_FILENAME_BASE",
"description: The description",
"---",
"",
"## ${1:Heading}",
"",
"$0"
],
}
}

The flexibility of snippets allows you to create powerful and bespoke productivity boosters. You can enhance the basic configuration from above with the specific frontmatter fields you need, change how the title gets generated, and more.

Using the snippet

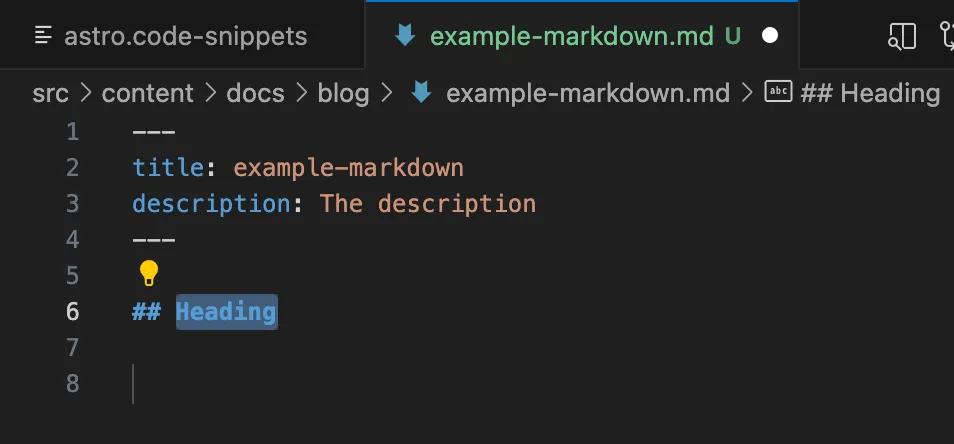
Create an empty Markdown (.md) or .mdx file. Start typing ffmt and press TAB ⇥ to trigger the snippet. If you do not see any suggestions, you can manually trigger them with Ctrl + Space and select the "Add Markdown frontmatter" snippet. Depending on your exact configuration, you can now tab through the fields to edit them to your current use case. For example the snippet from above allows you to directly edit the heading and then jumps to the content. The title field of the frontmatter will be set to the file name without its extension.

Screenshot of the Visual Studio Code editor, displaying generated content from a code snippet.

Further resources

If you find snippets useful and want to explore a VS Code extension which includes a decent set of preconfigured snippets, check out Astro Snippets by Shelton Louis.

Read more tips and tricks for working with Astro and Starlight on HiDeoo’s blog.

Stop Outsourcing Your Soul to AI

A painting showing a man with a bright, colorful brain, illustrating the concept of cognitive erosion and its impact on thought.

It has been more than two and a half years since the release of ChatGPT. The 30th November, 2022 marked the beginning of a new era. The start of AI. Nowadays, many professions and people in private lives, especially in the information technology sector, use it on a daily basis. And we do not even know where we are on the Gartner hype cycle or if AI will improve following Kurzweil’s “Law of Accelerating Returns”.

The trend is still rising, but at the same time I have noticed a slight but steady degradation of knowledge on a human basis because people delegate more and more creative work to AI. As a result, I have decided to write a little blog post, where I can share my thoughts, trying to discourage the overuse of Artificial Intelligence which would ruin our cognitive capabilities. And although I know that very little people read this, it does not stop me from trying. Otherwise, I might have missed my opportunity in helping humanities future.

Earworms and the message hidden within the pattern

A visual representation of a sound wave set on a pink background, showcasing the dynamics of sound frequencies.

Yes, this title is a small nod to the excellent Netflix series “Arcane”, but that’s not what this post is about.

Today, I want to share some thoughts about earworms, a term that originated in German (“Ohrwurm”) and was later adopted into English as a literal translation. The meaning behind this rather abstract term is catchy tunes—sticky music, as Wikipedia calls it. This phenomenon often occurs unpredictably, especially when our thoughts drift away from the present moment.

Some aspects of creating a blog are really easy, and some are extremely difficult!

A wooden table displays a notebook, a pen, and a steaming coffee cup, suggesting a productive writing session.

Talk a little bit about how one can become better (not master by any means, nobody is perfect) in writing a blog post. These are just my thoughts after two awesome guys from the Astro Community (jdtjenkinsJacob and louisescherLou) decided to write blogs about how hard and easy it is to write blog posts.

Please read their posts first as this is the follow-up on both of them:

  1. “Why is writing blog posts so hard?” - Jacob Jenkins
  2. “Why Writing Blogs isn’t hard” - Louis Escher
  3. “Some aspects of creating a blog are really easy, and some are extremely difficult!” - Felix Schneider

After that you have successfully completed this awesome trilogy of blog posts about blog posts.

From Balloons to Binary: A 20th Birthday Packed with Clues

A decorated birthday cake featuring two candles shaped like the number twenty, symbolizing a 20th birthday celebration.

This year, I turned 20 - and instead of simply lighting candles and inflating balloons, I wanted to celebrate in a more creative and personal way. The idea? Hide the number 20 in as many surprising, clever, and hidden forms as possible throughout a decorated living room - then capture it all in a single photo. Whether through mathematical puzzles or visual Easter eggs, the room transformed into a joyful riddle full of playful detail.

Designing a Profile That Works Within GitHub's Rules

Visual representation of git history with contributions stats, featuring text highlighted in green and blue for clarity.

Every great project starts with a realization of a problem. My GitHub profile README was cluttered, filled with too much information, too many badges, and an overwhelming amount of content that lacked style and structure. It had hackathon achievements, GitHub contribution graphs, various technical badges, and much more, making it visually unappealing and difficult to navigate. Initially, I thought this was an effective way to present myself, but over time, it became clear that the information was overwhelming rather than informative. I wanted something new, a more refined and visually appealing approach to presenting my profile, and the idea of implementing a bento grid came to mind. The goal was to create a layout that was not only functional but also aesthetically impressive and structured.

How I Built a GitHub Profile README That Shouldn't Exist (But It Does)

Overhead perspective of a soccer field with two prominent lines delineating the field boundaries.

Creating a standout githubGitHub profile README isn’t just about adding a few badges — it’s about pushing technical boundaries. In this deep dive, I explore low-level SVG manipulation, HTML-to-SVG conversion, inline animations, and full automation with GitHub Actions to build what I believe is one of the most technically advanced GitHub READMEs. From a dynamic Bento Grid that updates every 5 minutes to embedding live SVGs without external requests, this project transformed my profile into a living, self-updating showcase of my work. Want to know how I did it? Let’s break it down. 🚀

Setting up Kubernetes with Cilium and Cloudflare

A cube in 3D with a yellow and green sticker applied to its surface, showcasing a geometric design.

This blog posts describes the process of setting up a KubernetesKubernetes cluster with k3sk3s and CiliumCilium. We use HelmHelm as the package manager and CloudflareCloudflare as the certificate issuer. We used the tips and tricks from Vegard S. Hagen from his article. Essentially, this blog explains, how all the trueberryless.org websites are deployed (not any more).